field of solar panels

Solar Potential:

Today we will talk about the basics around solar power in Canada. While solar resources vary across the country, technological advancements have made solar power a viable option for Canadians.

How Solar Power Works:

Solar power is generated using photovoltaic (PV) cells, which convert sunlight into electricity. Here’s a simplified explanation:

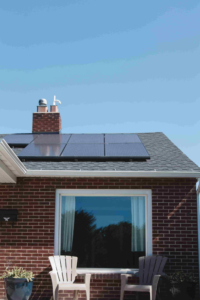
  • Photovoltaic Cells: Solar panels consist of photovoltaic cells made of semiconductor materials, usually silicon. When sunlight hits these cells, it excites electrons, generating an electric current.
  • Inverter Conversion: The direct current (DC) electricity produced by the solar panels is converted into alternating current (AC) electricity using an inverter. AC is the type of electricity used in most homes and businesses.
  • Grid Connection or Storage: The electricity can be used on-site or fed into the grid. Some systems include battery storage, allowing homeowners to store excess energy for later use.

man putting solar panels onto the roof of his home

Systems to consider vary in size, such as 5 kW, 10 kW, 12 kW, and so on; this refers to the capacity or size of a solar power system, specifically its maximum power output under ideal conditions. The capacity of a solar power system is typically measured in kilowatts (kW) or megawatts (MW), and it indicates how much electricity the system can generate.

Here’s what each of these capacity specifications means:
  1. 5 kW System:
    • A 5 kW system has a capacity of 5 kilowatts.
    • This means that, under optimal conditions, the system can produce 5 kilowatts of electricity per hour.
    • This system is often sufficient to cover a significant portion of an average household’s electricity needs.
    • It can power essential appliances such as refrigerators, lighting, televisions, computers, and other small electronics.
    • It may not be enough to cover the entire energy consumption of larger homes or homes with high energy demands, especially during peak usage times.
  2. 10 kW System:
    • A 10 kW system has a capacity of 10 kilowatts.
    • It can generate double the amount of electricity compared to a 5 kW system under the same conditions.
    • A 10 kW system has a higher capacity and is more likely to cover the electricity needs of a larger home.
    • It can power all the appliances mentioned for the 5 kW system and potentially support additional appliances, such as a washing machine, dryer, or electric stove.
    • Depending on the location and efficiency of the system, it might even cover the majority of a larger home’s energy needs.
  3. 16 kW System:
    • A 16 kW system has a capacity of 16 kilowatts.
    • It has a higher capacity than the 5 kW and 10 kW systems, indicating a larger and more powerful solar installation.
    • A 16 kW system is a robust installation with the potential to power a significant portion of a larger home’s energy demands.
    • It can power all the appliances mentioned for the 5 kW and 10 kW systems and may have the capacity to support additional high-energy appliances or multiple HVAC units.
    • In some cases, a well-designed and efficient 16 kW system could cover the entire energy consumption of a large home.

Note that the actual energy production of a solar power system can vary based on factors such as sunlight exposure, geographic location, shading, and system efficiency. Conduct a thorough energy audit to determine your specific energy needs.

Consulting with a local solar professional can provide a more tailored assessment based on your individual circumstances.

solar panels

Costs of Solar Power:

  • Installation Costs: The cost of installing solar panels depends on factors such as system size, location, and the complexity of the installation. Prices have decreased over the years due to technological advancements and increased demand.
  • Government Incentives: Various provinces and territories offer incentives, rebates, and tax credits to encourage solar adoption. These can significantly reduce the upfront costs.
  • Operational Costs: Solar systems have low operational costs as they require minimal maintenance. Regular cleaning and occasional checks are typically sufficient.

Return on Investment (ROI):

While the initial investment in solar panels can be significant, homeowners often experience a positive return on investment over time. The ROI can vary based on several factors, including location, system size, local incentives, and energy consumption. Let’s break down the costs and potential savings for a home installation based on a 1500 square foot home:

Installation Costs: Depending on the system, size, and far too many factors, the cost of installation is too difficult for me to predict. My research suggests that before rebates or incentives, solar panels can range anywhere from $10,000 to $40,000. (A proper consultation is the best way to know what your home costs would be)

Annual Savings: The savings from a solar panel system come from the electricity generated and the reduction in your electricity bill. On average, a 5 kW system can generate around 6,000 to 8,000 kWh per year, depending on factors like sunlight exposure and system efficiency.

Annual Savings ≈ Annual Electricity Production (kWh) × Electricity Rate (per kWh)

For example, if your electricity rate is $0.15 per kWh on a 5kW system:
Annual Savings ≈ (6,000 kWh to 8,000 kWh) × $0.15    = $900 to $1200

Payback Period: The payback period, or the time it takes for your solar investment to pay for itself through savings, can be calculated by dividing the installation cost by the annual savings.

Payback Period (years)=Installation Cost / Annual Savings

As a rough estimate, the payback period for a residential solar panel system in Canada is often in the range of 5 to 15 years.

Important Note: These calculations are approximate, and actual costs and savings can vary based on specific circumstances. It’s recommended to consult with local solar providers and take into account any changes in technology, energy rates, and government incentives

Environmental Benefits:

Solar power is a clean and renewable energy source, producing electricity without emitting greenhouse gases. Choosing solar helps reduce dependence on non-renewable resources and contributes to a more sustainable energy future.

Challenges:

Challenges in Canada include variations in sunlight intensity depending on the region, occasional extreme weather conditions, and the upfront costs.

On average, solar panels can last for 25 to 30 years or more. Many manufacturers offer performance warranties that guarantee the panels will still produce a certain percentage of their rated power output after a specified number of years, often 80% or more after 25 years.

Several factors contribute to the longevity of solar panels:

  1. Material Quality: The quality of materials used in the manufacturing of solar panels is a significant factor. High-quality panels made with durable materials tend to have a longer lifespan.
  2. Manufacturing Standards: Panels produced in accordance with industry standards and quality control measures are more likely to withstand environmental stresses and maintain performance over time.
  3. Environmental Conditions: The local climate and environmental conditions can impact the longevity of solar panels. For example, extreme weather events, such as hailstorms or hurricanes, can potentially damage panels. However, most panels are designed to withstand standard weather conditions.
  4. Maintenance: Proper maintenance, such as occasional checks for damage or shading issues, can contribute to the longevity and efficiency of solar panels.

Conclusion:

Solar power in Canada is a promising and increasingly accessible source of clean energy. As technology advances and costs continue to decrease, more homeowners and businesses are adopting solar solutions, contributing to a greener and more sustainable energy landscape.

If you have any comments, please reach out to BridenAcademy@BridenSolutions.ca

rope net

These 6 examples of knot tying are an important skill for outdoor enthusiasts, boaters, climbers, and anyone engaging in activities that involve ropes. Each knot serves a specific purpose.  In this guide, we’ll explore the applications of only six knot types to get you started. Know there are dozens of knot types that serve varying purposes.

Disclaimer: Climbing is inherently risky, and knot tying is a skill in managing those risks. The information provided here is for educational purposes only. Before engaging in any rope activity, ensure that you receive proper training and guidance from certified professionals. Practice tying knots in controlled environments. Always prioritize safety, seek qualified instruction, and exercise caution.

  1. Square Knot:

    square knot

    square knot

The square knot, also known as the reef knot, is a simple knot used for joining two ropes of similar diameter. Its primary applications include:

  • Securing Packages: When packaging items or securing a bundle, the square knot provides a quick and straightforward way to join two ends of a rope securely.
  • Tying Bandages: Used to tie bandages or fabric strips together, providing a snug and adjustable fit.
  • Crafts and Hobbies: Artists and crafters use square knots to create friendship bracelets, keychains, and various decorative items.
  1. Bowline Knot:

Bowline knot

Bowline knot

The bowline knot forms a secure and non stick loop at the end of a rope and is known for its reliability. Key applications include:

  • Rock Climbing: Climbers often use the bowline to secure themselves to a harness, creating a reliable and easily untied loop.
  • Rescue Situations: In rescue scenarios, the bowline creates a loop to hoist or lower people or equipment safely.
  • Sailing: Sailors secure sails to lines, creating a non-slip loop easily untied, even after being subjected to heavy loads.
  • Camping: Used for securing tents or tarps.


  1. Figure 8 Knot:

    Figure 8 knot

    Figure 8 knot

The figure 8 knot, also known as the Flemish knot, is used as a stopper knot at the end of a rope. You can follow the 8 around to make a double figure 8 knot. See the video below by Billy as he demonstrates how to tie this variation!

Its applications include:

  • Rock Climbing: Creates a secure and easily recognizable stopper at the end of a climbing rope.
  • Boating: To prevent lines from slipping through cleats or blocks.
  • Camping: Used as a stopper knot to prevent tent lines from slipping through stakes.
  • Scouting and Girl Guides use this knot to tie their scarves & ties.


  1. Alpine Butterfly Knot:

    Alpine Butterfly Knot

    Alpine Butterfly Knot

This knot I had to enlist my 14 year old son to help me learn. It is very unique and once we figured it out, its really quite fun to tie! The alpine butterfly knot creates a secure mid-line loop, and is a good choice for load bearing needs.  You can find applications in various outdoor activities:

  • Climbing and Mountaineering: Climbers use the alpine butterfly to create a secure and load-bearing loop in the middle of a rope.
  • Rescue Operations: Rescue teams use this knot to create a central attachment point for hoisting or lowering operations.
  • Hikers and campers use the alpine butterfly to create a secure attachment point for hanging gear or creating a makeshift clothesline.
  1. Double Half Hitch Knot:

double half hitch

Double Half Hitch Knot

The double half hitch knot is a simple hitch that adds stability to other knots or is used on its own. Applications include:

  • Securing Tarps and Tents: Campers secure tent lines or attach tarps to trees or poles.
  • Boating: When securing a boat to a docks.
  • Creating Quick Lashings: Used to quickly lash together branches or other materials for shelter construction.

     6. Slip Knot:

slip knot

Slip Knot

  • A quick release, easy to tie (and untie) knot
  • Slip Knots create a temporary tourniquet or to secure a makeshift bandage.
  • Artists and DIY enthusiasts use slip knots for various crafting projects or for quickly lashing together materials.
  • Commonly used by ranchers and farmers when tying off horses or cows
  • I use a slip knot to tie off excess rope or line, to keep it off the ground, and neat and tidy.
  • Not ideal for heavy loads because it is not as secure as other knot styles.

Conclusion:

Mastering these fundamental knots provides a solid foundation for anyone working with ropes in various environments.  Practice tying them in different scenarios to build confidence in your knot-tying skills. Happy tying!

snowstorm in winter

As winter approaches, Canadians must brace for the challenges of harsh winters, or even winter storms. From blizzards to extreme cold, being prepared for cold weather emergencies is important. Let’s explore essential tips and  examples to ensure your safety during frosty Canadian winters.

Let me preface this with the fact that I acknowledge that Canada is the 2nd largest (in land mass) country in the world. Which means, winter from Vancouver to Nunavut to New Brunswick differs immensely! Even from Northern BC, AB, SK to the southern parts of the provinces experience very different winters. Adapt your winter preparations accordingly.

Steps to Prepare for a Winter Emergency

1. Creating a Winter Emergency Kit

Prepare a comprehensive winter emergency kit for your home and vehicle.72 hour kit 4 person deluxe

Home:
  • Focus on food storage, water, first aid, a well stocked emergency kit, a shovel, ice melt, and your toboggan (for when the emergency is over of course). Check out this article for a very detailed list for an emergency home kit (or 72 hour kit).
Vehicle:
  • Blankets or Sleeping Bags
  • Flashlight and Batteries
  • Shovel
  • Ice Scraper and Snow Brush
  • Sand or Kitty Litter – for traction
  • Jumper Cables
  • Basic Tool Kit: Items like a multi-tool, screwdriver, and wrenches.
  • First Aid Kitcar tow rope
  • Battery-Powered or Hand-Crank Radio
  • Reflective Warning Triangles or Road Flares
  • Tow Rope or Chain
  • Extra Winter Clothing: Include hats, gloves, and extra layers.
  • Non-Perishable Snacks: High-energy snacks like energy bars or nuts.
  • Water Bottles: Be mindful of freezing temperatures
  • Portable Phone Charger
  • Spare Tire and Tools: Ensure your spare tire is in good condition at the beginning of each winter season, and that you have the necessary tools to change a tire.
  • Car Escape Tool

2. Home Winterization:

Here are ideas how to winterize your home:

  • Insulate Windows and Doors: Apply draft stoppers or weather stripping to windows and doors to prevent drafts. Install storm windows or use window insulation film to add an extra layer of protection.
  • Seal Leaks and Gaps: Check for gaps and leaks in walls, ceilings, pipes, vents and floors. Use caulking or weather-resistant sealant to seal openings.
  • Insulate Attic and Walls: Ensure proper insulation in your attic and walls. Adequate insulation helps retain heat and reduces energy costs.
  • Service Your Heating System: Schedule regular inspection and maintenance for your heating system. Replace filters and ensure that vents and radiators are unblocked for efficient heat distribution.
  • Check and Clean Chimneys: Have the chimney inspected and cleaned by a professional. Ensure the damper is working correctly to prevent drafts when the fireplace is not in use.
  • Protect Pipes: Insulate exposed pipes to prevent freezing. Use pipe insulation or heat tape, especially in unheated areas like basements and attics. Disconnect garden hoses and turn off outdoor water faucets.
  • Programmable Thermostat: Install a programmable thermostat to regulate temperatures efficiently. Lower the temperature when away and at night.
  • Reverse Ceiling Fans: Change the direction of ceiling fans to clockwise. This helps circulate warm air trapped near the ceiling, keeping rooms warmer.
  • Winterize Air Conditioning Units: If you have central air conditioning, cover the outside unit or remove window units.
  • Stock Up on Winter Supplies:  Ensure you have an adequate supply of winter essentials, including salt or ice melt for sidewalks, and a snow shovel.

3. Safe Winter Driving:

winter driving conditions

Here are a few safe winter driving tips:

  • Prepare Your Vehicle: Ensure your vehicle is winter-ready by checking the battery, tires, brakes, and fluid levels. Have all-season or winter tires for better traction on snow and ice.
  • Check Weather and Road Conditions: Stay informed about current weather and road conditions before you travel.
  • Keep a Safe Distance: Increase your following distance in winter weather. Slippery roads take longer to stop on snow or ice-covered surfaces.
  • Slow Down: Reduce your speed in adverse weather conditions. Driving at a slower pace allows you more time to react to unexpected situations.
  • Avoid Cruise Control: In winter conditions, refrain from using cruise control. You want to maintain full control of your vehicle at all times.
  • Clear All Snow and Ice: Before driving, clear all snow and ice from your vehicle, including windows, and hood. This improves visibility and prevents snow from blowing onto your windshield while driving.
  • Use Headlights: Keep your lights on, even during daylight hours. Check taillights are functioning.
  • Brake with Caution: Brake gently to avoid skidding. If your vehicle has anti-lock brakes (ABS), apply firm and continuous pressure. If you don’t have ABS, use a pumping motion to prevent skidding.
  • Watch for Black Ice: Bridges, overpasses, and shaded areas are common locations for black ice.

4. Some Other Tips for Winter Conditions:

city snowfall

  • Be Cautious Near Frozen Bodies of Water: Avoid walking or driving on frozen lakes, ponds, or rivers unless you are certain the ice is thick enough. Thin ice can be deceptive and pose a serious safety risk.
  • Know the Signs of Hypothermia and Frostbite: Learn the symptoms of hypothermia (excessive shivering, confusion, slurred speech) and frostbite (numbness, tingling, or pain in extremities). Seek medical attention if you suspect either condition.
  • Watch for Ice: Be cautious of icy surfaces, especially on sidewalks, driveways, and parking lots. Walk slowly, use handrails if available, and wear footwear with good traction.
  • Stay Hydrated: Cold weather can be deceptively dehydrating. Drink plenty of water, and avoid excessive consumption of caffeine or alcohol, as they can contribute to dehydration.
  • Dress Appropriately: Wear layered, insulated clothing, including a waterproof outer layer. Ensure you have a hat, gloves, and waterproof boots to stay warm and dry.

Conclusion:

By implementing the safety rules and winterization measures discussed, we fortify ourselves against the challenges that colder months bring. Whether it’s securing our homes, winterizing our vehicles, or adopting safe practices in various situations, each proactive step contributes to a defense against winter’s unpredictable conditions. As we navigate through winter’s frosty landscapes, let us prioritize safety and support one another. Stay warm, stay safe, and embrace the season with confidence.


Deciding when to call 911

Knowing when and how to contact 9-1-1 and when to contact the authorities is a daunting task sometimes. 9-1-1 is ingrained in our consciousness, but understanding when to dial it versus reaching out to local authorities is a decision that requires thoughtful consideration during a stressful situation. This article explores what constitutes an emergency, how to determine the severity of a situation, and whether it’s advisable to call even when uncertain.

Before we begin: If you do not have programmed into your phone or written on your emergency contact list the phone number of your local authorities (ex: for me that is the Cochrane RCMP dispatch), pause and do that now. :)

Understanding 9-1-1:

Origin:

The concept of a single, easy-to-remember emergency number originated in the 1960s. The Federal Communications Commission (FCC) recommended the use of 9-1-1 as a nationwide emergency number, and in 1968, the first 9-1-1 call was made in Haleyville, Alabama. Over time the 9-1-1 system gained widespread adoption, becoming the primary means for individuals to request assistance during emergencies across North America and other countries.

Rule: Dial 9-1-1 when there is an immediate threat to life, property, or public safety.

  • Examples include accidents with injuries, violent crimes in progress, or medical emergencies.
Reporting Crimes & Medical Emergencies:

If a crime or accident has occurred but is not an immediate threat, contact your local authorities’ non-emergency line.

“Not an immediate threat” refers to situations where there is no imminent danger to life, property, or public safety, and a prompt emergency response is not required. These are scenarios that, while concerning or inconvenient, do not pose an immediate risk that demands urgent intervention. Here are some examples to illustrate “not an immediate threat”:

  • Non-Violent Disputes: Arguments or disputes that do not involve physical violence or the threat of immediate harm.
  • Minor Traffic Accidents without Injuries: Fender-benders or minor traffic accidents where there are no visible injuries and the vehicles are not blocking traffic may
  • Noise Complaints: Loud parties or disturbances that are disruptive but do not involve violence or pose an immediate risk to safety.
  • Property Crimes that Have Already Occurred: Crimes such as vandalism or theft that have already taken place and do not present an ongoing threat.
  • Non-Urgent Medical Situations: Non-urgent medical issues or situations where medical attention is needed but not urgently but could seek medical advice via a medical practitioner or a hospital.

It’s important to use discretion and consider the context of each situation. If there is any doubt about whether a situation constitutes an immediate threat, it is advisable to err on the side of caution and call 9-1-1.

Determining an Emergency:

  • Assess the level of immediate danger. If anyone’s life or well-being is at risk, call 9-1-1
  • Assess how quickly a situation requires intervention
  • Evaluate the nature of the incident. Is it a crime in progress, a medical emergency, or a situation that could escalate rapidly?
Conclusion:

Knowing when to call 9-1-1 versus reaching out to local authorities is a responsibility we all share. By understanding the nature of emergencies and calling for help, we contribute to the effective functioning of emergency response systems. Make informed decisions about when and how to seek help! Be safe

Alpen fuel flavors 6 pack

Gluten Free & Vegetarian Breakfasts in 6 allergen friendly flavors! I wanted to share these because as a mom of a celiac, these are so incredible. For camping, backpacking, generic traveling, or a grab and go breakfast, these are easy and delicious.

Kelly Kettle Basecamp kit

If you are backpacking or backcountry camping, consider the JetBoil or Kelly Kettle to cook with!

Alpen Fuel’s Origin Story:

Shaun and Emily Durkee, the owners of Alpen Fuel, started Alpen Fuel in 2018 as a side hustle while Shaun worked his day job as a manufacturing engineer for an optics company in Bozeman, Montana. At first, they stocked an online store with many different backcountry food products from cottage brands. In June of 2020, Shaun was laid off from his job as a result of the economic downturn surrounding COVID-19.

After being laid off, they pursued their passion by launching four flavors of high octane breakfast granola in the fall of 2020. Since then, we added two new breakfast flavors and quickly outgrew our rented kitchen space. They now have a 2300 sq. ft. manufacturing facility, and Alpen Fuel products are sold in over 60 locations throughout the United States and Canada, including us at Briden Solutions!

Alpen fuel flavors 6 pack

Check out these two videos by our very own Billy testing 2 of the flavors:


Fort McMurray Wildfire Evacuation

“It won’t happen to me, right?” is a phrase we often hear (or think) when discussing being prepared. Many people live under the assumption that they are immune to unexpected situations. While no one wants to dwell on worst-case scenarios, the truth is that life is unpredictable. Natural disasters, accidents, and emergencies can strike anyone or any community at any time.In this article today, we will explore the importance of preparedness and how it can make a significant difference in the face of adversity.

1. Natural Disasters

Mother Nature can be both breathtakingly beautiful and devastatingly cruel. Earthquakes, floods, hurricanes, tornadoes, wildfires, and more can occur with little to no warning. While you may live in an area that is historically less prone to such events, o remember that shifts in weather patterns have made many regions more susceptible to natural disasters.

Example: The Calgary Flood of 2013

  • Evacuations in 26 communities, 110,000 affected.
  • More than 1,600 people registered for support on first day.
  • 16 LRT stations closed.
  • More than 20 bridges were closed.
  • 30 parks across Calgary were flooded.
  • More than 50 bus routes were cancelled.
  • 34,000 locations were without electricity

2. Accidents and Injuries

A car crash, a fall, or a kitchen accident, being prepared with basic first aid abilities can mean the difference between life and death. Knowing what to do in an emergency and having supplies on hand can save precious minutes when professional help is on the way.

CPR First aid class

Pro Tip: Consider joining the world-wide team of certified First-Aiders! It has been extremely helpful in  my own life, like when my oldest son passed out and fell down our stairs splitting open his eyebrow. I was able to follow the steps needed, stay calm, and get him to a doctor knowing I was doing all the right things.

3. Financial Hardships

Loss of a job, a sudden illness, or a natural disaster can have a significant impact on your financial stability. Having an emergency fund in place can provide a safety net during difficult times without severe disruption to your life.

money and savings

How much should you save in an emergency fund? Consider as a starting point a 1 month fund. This is equal to the amount of 1 month worth of income. From there aim for 3 months, then 6 months, then a full year. Don’t be discouraged if this feels unattainable! Start small, and keep persevering.

Pro-Tip: In a financial course I took I was encouraged to pay myself first and then my bills. It started small, and it took an entire year to attain my first 1 month worth of emergency fund. Then guess what happened? I had an emergency occur that required almost all of it! From there I already had the habit in place so I kept on putting it away to re-save that 1 month fund.

4. Personal Security

security

Home Security: Consider securing your home with locks, alarms, security cameras, and proper lighting. Additionally, having a designated location within your home (or out of the home) may be helpful.

Personal Safety: Being aware of your surroundings, especially in unfamiliar or potentially dangerous environments, is a fundamental aspect of personal security. Self-defense training can also empower you to protect yourself physically. Two rules in our family is that you do not go anywhere without telling someone, and do not put yourself in a place that could cause risk. An example being that back alley’s may not be a safe place to hang out after dark.

Financial Security:
  • Identity Theft Protection: Safeguard your personal and financial information from theft or misuse. This includes practices like regularly checking your credit report, using strong, unique passwords, and monitoring your financial accounts.
  • Emergency Fund: Building a financial safety net in the form of an emergency fund can help you navigate unexpected financial crises, such as job loss or medical expenses.

Cyber Security – Phones & Computers:internet security

  • Online Privacy: Protecting your online identity and data is essential. This involves using secure and unique passwords, enabling two-factor authentication, and being cautious about sharing personal information on the internet.
  • Anti-Virus and Security Software: Installing reputable anti-virus and security software on your devices helps defend against cyber threats like malware, ransomware, and phishing attacks.
Emergency Preparedness:
  • Emergency Kit: Having a well-stocked emergency kit that includes essential supplies like food, water, first aid, and communication tools can help you and your family stay safe during natural disasters or other emergencies. Check out our 72 hour kits here.
  • Emergency Plan: Creating a comprehensive emergency plan that outlines how your family will respond in different scenarios, including evacuation procedures and meeting points, is essential.

hikingTravel and Transportation Security:

  • Safe Travel Practices: Whether traveling by car, public transport, or plane, following safe travel practices, including having a reliable vehicle, staying alert while driving, and securing your belongings, can reduce the risk of accidents and theft.
  • Travel Insurance: Depending on your travel plans, travel insurance can provide coverage for trip cancellations, medical emergencies, and lost or stolen belongings.

Community Security: Building strong connections with your community, getting to know your neighbors, and participating in community safety initiatives can enhance your overall personal security by fostering a supportive and watchful environment.

Example: My neighbor and I have our eyes out for each other’s property and homes. When a package is delivered, we text the other to let them know. In a more extreme case, we had a neighborhood safety lockdown one day, but she hadn’t heard about it. I saw her door open, called her with no answer, so I ran over and shared the news so she could lock her doors for added safety. “Thou shalt love thy neighbor” the good book tells us!

5. Health and Well-being

No one is immune to health issues. Regular check-ups and a healthy lifestyle can reduce your risk, but it’s impossible to predict every health challenge you may face.

6. The “Worst-Case Scenario”

While we never want to think about it, there is the possibility of more catastrophic events like global pandemics or widespread economic downturns. Recent history has shown us that these events are not beyond the realm of possibility. Preparing for such scenarios might seem daunting, but even small steps can make a significant difference in your ability to weather the storm.

bills and coins

Here’s a few examples that could be a ‘worst case scenario’:

Job Loss or Income Reduction:
  • In the event of a worst-case scenario, you might lose your job, experience a significant reduction in income, or face long-term unemployment. This situation can have a cascading effect on your ability to meet everyday expenses, maintain debt payments, and plan for your future. Having an emergency fund in place can help cover essential costs during this period, reducing financial stress.

Major Medical Expenses:

  • A serious illness or injury can lead to substantial medical bills, even with health care or insurance. In a worst-case scenario, these expenses could be overwhelming. Adequate health insurance coverage and an emergency fund can provide a financial safety net to manage unexpected medical costs.
  • Example: my upcoming “Alberta Health Care covered” foot surgery will still have a $500+ bill attached for necessary supplies.
Natural Disasters and Property Damage:
  • Your home or property might be damaged or destroyed due to natural disasters such as hail, floods, earthquakes, or wildfires. Insurance coverage for property and possessions, as well as an emergency fund, can help you recover and rebuild your life.

Economic Downturns or Rising Inflation:

  • Economic recessions or financial crises can result in job loss, declining investments, increasing prices and reduced income opportunities. Preparing for a worst-case scenario in the economy involves diversifying your investments, reducing debt, and ensuring your financial stability is not solely reliant on a thriving economy.

Legal or Financial Liabilities:

  • Facing legal issues, lawsuits, or unexpected financial liabilities can have devastating financial consequences. Liability insurance and careful legal planning are essential for protecting your assets.
  • Example: I have a family member who has been in and out of court with a messy situation in regard to a relative, and legal costs add up very quickly.

Loss of a Spouse or Family Member: The death of a spouse or family member can bring both emotional and financial challenges. Life insurance and estate planning can help mitigate the financial impact, ensuring your family’s financial well-being in such a worst-case scenario.

Disability or Long-Term Care Needs: Injuries or the need for long-term care can lead to substantial costs and reduced income. Having an emergency fund or savings may assist in this situation.

Retirement Shortfalls: In a worst-case scenario, you might outlive your retirement savings, leaving you financially strained in your later years. Careful retirement planning, including regular contributions to retirement mask covidaccounts and investments, can help ensure your financial security during retirement.

Pandemic or Global Health Crisis:
  • Recent events like the COVID-19 pandemic have demonstrated how global health crises can disrupt economies, jobs, and daily life. Building a robust emergency fund and maintaining essential insurance coverage can help you navigate these uncertain times.

It’s important to remember that while preparing for worst-case scenarios is wise, it doesn’t mean living in constant fear or extreme frugality. Instead, it’s about making informed decisions, planning for contingencies, and establishing a strong financial foundation to safeguard your future.

Conclusion

“It won’t happen to me, right?” is a belief that many unintentionally hold. It’s a belief that can leave you unprepared when life takes an unexpected turn. Being prepared is not about living in fear. It’s about taking responsibility for your well-being and that of your loved ones. It’s about being proactive and having a plan in place for when the unexpected occurs.

Preparedness is not a one-size-fits-all solution. It’s about assessing your unique situation, recognizing potential risks, and taking steps to mitigate those risks. Whether it’s creating an emergency kit, food storage, learning basic first aid, establishing financial security, or staying informed about your health, preparedness can make a significant difference in your ability to adapt and overcome life’s challenges. Remember, being prepared doesn’t mean you’re expecting the worst; it means you’re ready for whatever comes your way, and that’s a powerful position to be in.

self defense

Cultivating self-defense skills and being equipped with the right tools can be instrumental in ensuring one’s well-being. Whether navigating urban environments or venturing into the great outdoors, understanding self-defense principles and having the appropriate know-how can provide a sense of security. In this article, we’ll explore practical strategies and essential equipment to enhance your personal preparedness.

Before I continue, I would like to state a disclaimer that the definition of self defense is: “a set of actions or strategies taken by an individual to protect oneself from harm, aggression, or potential danger”. The key being to protect oneself. By no means do I suggest or support instigating an altercation. I do however fully support the learning of necessary skills!

Knowledge is Power: Self-Defense Basics

  • Start by understanding basic self-defense principles:
      • Situational awareness: be aware of your surroundings. Limit distractions (like excessive phone use) when walking in public spaces. Three parts of situational awareness include perception (be aware), comprehension (think about what you see), and projection (consider the possible outcomes of what you are seeing).journey of a thousand miles begins with a single step
      • De-escalation techniques: Should you find yourself in a heated situation, here are some basic considerations.
            • Active Listening
            • Empathize
            • Stay Calm
            • Body Language (ex: avoid crossing your arms, maintain distance)
            • Clarify and summarize what you’re hearing
            • Set boundaries
      • Trust your instincts: If something feels wrong or off, trust your instincts. Remove yourself from the situation calmly and quietly.
      • Enroll in self-defense classes to learn practical skills like striking, blocking, and grappling. Many communities offer classes tailored to various skill levels.

Self-Defense Gadgets and Technology

  • Safety Apps: Explore smartphone built in apps and other apps designed for personal safety. These apps often include features like real-time location sharing, emergency alerts, and quick access to local authorities.
  • Wearable Safety Devices: Consider wearable devices with built-in safety features, such as panic buttons or automatic distress signal transmission.

Home Security Measures

  • Personalized Home Defense Plans: Develop a home defense strategy with family members, including safe zones, communication methods, and emergency procedures. This may include alarms or cameras depending on your preferences.

Canadian Wildlife:

Wildlife Awareness and Avoidance:

  • Understand the wildlife in the area where you’re exploring. Research the types of animals present and their behaviors to better anticipate potential encounters.
    • For example: When I am in Kananaskis Country, I am aware and as prepared as I can be to encounter bears, cats (the big kinds), moose, and depending on the time of year (mating season) other animals. I am aware of what season it is because that can affect the behavior of animals that are having their babies, or preparing for the winter. And, I am aware of the bug of choice that year. This year of 2023 in particular was a heavy tick year, so we took special precautions to check for them after each excursion.
  • Observe wildlife from a safe distance. Avoid approaching animals too closely, especially those with young or displaying defensive behaviors.
  • Store food securely to avoid attracting wildlife to your campsite. Use bear canisters or bear bags, and follow local guidelines for food storage.
  • Store food securely during a picnic and do not leave it unattended.

Personal Safety Measures:

  • Travel in Groups: When possible, travel in groups. Larger groups are often perceived as more intimidating to wildlife, and there’s increased safety in numbers.
  • Make Noise: Make noise while hiking, especially in areas known for bear or cougar presence. This alerts wildlife to your presence, reducing the likelihood of surprise encounters. Have a whistle, an airhorn and/or a flare in your pack.
  • Carry Bear Spray: In regions with bear populations, carry bear spray and know how to use it. It can be effective in deterring bears and other aggressive wildlife.

Here is a video made by Alberta Parks about how to use Bear Spray. I have been hiking for a decade, and have never encountered a bear, but still faithfully carry my spray in hopes I will never need it. I like to watch videos such as this one to re-educate myself regularly.

Navigation and Emergency Preparedness:

  • Navigation Skills: Develop strong navigation skills to avoid getting lost. Carry a map, compass, and/or GPS device, and familiarize yourself with the terrain.
  • Emergency Communication: Carry a fully charged cell phone or satellite communication device for emergencies. Inform someone of your itinerary and expected return time.
  • First Aid Knowledge: Learn basic first aid skills, including how to treat injuries common in outdoor settings. Carry a well-stocked first aid kit.

Campsite Security:

  • Select a Safe Campsite: Choose campsites with safety in mind, including proximity to water sources, visibility, and avoiding areas with signs of recent wildlife activity.
  • Secure Sleeping Area: Use proper storage for food and scented items. Tents and sleeping areas should be set up away from potential wildlife pathways.
  • Campfire Safety: Follow Leave No Trace principles and practice responsible campfire safety. Keep a safe distance from tents, avoid leaving food residues, and fully extinguish fires.

Self-defense at home and in nature requires a combination of knowledge, preparation, and practical skills. By understanding the environment, adopting responsible practices, and having the right tools, you can enjoy outdoor activities with an increased sense of safety and confidence. Remember, personal safety is an ongoing journey, and staying vigilant and well-prepared contributes to a safer and more secure lifestyle.

hiking in the winter

This blog post is a little different, written in the form of a story, touching on the various aspects of being ready for a winter hike, ski, or snowshoe adventure. I hope you enjoy it, and it sparks some joy into your life thinking about how lovely (even with challenges) a winter adventure can be, especially when prepared!

winter boots

WINTER ADVENTURE

As the first snowflakes gently blanket the world outside, a thrilling sense of anticipation sets in—a winter wonderland adventure awaits. Whether you’re gearing up for a snowshoeing escapade, cross-country skiing exploration, or a cozy winter hike, careful preparation turns your snowy dreams into a reality.

Packing for the Chill

The journey begins at home, surrounded by gear and excitement. As I carefully select my clothing, layers become my allies—thermal base, insulating mid-layers, and a waterproof outer shell to repel the winter chill. Wool socks, gloves, and a trusty toque find their place in my pack.

Next comes the gear—snowshoes, cross-country skis, or winter hiking boots and trekking poles. I like to have ice cleats as well. A thermos of hot chocolate, energy-boosting snacks, my meal pouch & JetBoil, and a compact first aid kit join the well equipped backpack. I double-check the weather forecast, ensuring my preparations align with the whims of winter.

Embarking on the Trail

With the car packed and excitement bubbling, I embark on the journey to the winter wonderland. The drive through snow-covered landscapes is a prelude to the adventure that awaits. Arriving at the trailhead, I feel a mix of anticipation and tranquility—a snowy trail leading to unexplored beauty.

Boots crunch on fresh snow as I take the first steps, the winter wilderness unfolding before me. The air is crisp, and the only sound is the gentle whisper of the mountains. The preparation pays off—the layers keep me warm, the gear proves reliable, and the trail beckons with every twist and turn.

Midday Meal in the Snowy Silence

mountain house spaghetti

As the midday sun hovers above, it’s time to refuel and recharge. Finding a sheltered spot, I retrieve my trusty Jetboil from the backpack—a compact stove that promises a warm meal in the heart of the winter wilderness. A Mountain House pouch, carefully chosen for its simplicity and hearty flavors, transforms into a steaming feast. The snow-covered surroundings become my dining room, and the hot meal provides a comforting break, fueling me for the afternoon adventures. A cup of rich hot chocolate, prepared on the Jetboil, adds a sweet touch to the snowy feast, warming not just my hands but also my spirit.

Navigating the Winter Wilderness

As I delve deeper into the winter wonderland, nature’s artistry reveals itself. Snow-laden branches create archways, and the landscape sparkles in the soft winter light. Navigating the trail becomes a dance, whether on snowshoes, skis, or foot, each step a celebration of the winter beauty.

The trek is not without its challenges—a steep ascent tests my endurance, and icy patches require careful navigation. Yet, with every challenge conquered, the winter wonderland rewards me with panoramic views and a sense of accomplishment.

Facing the Unexpected: A Test of Preparedness

snowstorm in winterAs the afternoon unfolds, a sudden shift in weather brings unexpected challenges. Dark clouds gather, and the serene snowfall turns into a relentless storm. The once familiar trail becomes obscured, and visibility diminishes rapidly. In this moment, the importance of emergency preparedness becomes vividly clear. Instinctively, I reach for the map and compass, skills honed in preparation for unforeseen circumstances.

Navigating through the now challenging conditions, I deploy the trekking poles for stability and reassurance. The winter wonderland, once serene and welcoming, now demands a different kind of respect. The preparedness pays off as I navigate through the unexpected challenge, finding solace in the knowledge that each step is guided by a blend of experience, gear, and the ability to adapt.

In the face of adversity, the winter wilderness reveals its untamed nature, and the journey becomes a lesson in resilience. The snowstorm, though challenging, becomes an unexpected highlight—a chapter in the winter adventure story, reminding me that the prepared mind and well-packed backpack are the greatest companions in the unpredictable dance of nature.

The Reward at Journey’s End

After hours of snowy exploration, the destination comes into view—a pristine snowy vista, adorned in white. The effort and preparation culminate in a moment of awe. A thermos of hot chocolate and a well-deserved snack become a feast in the winter wilderness—a celebration of nature’s wonders and personal triumph.

As I sit, surrounded by the hushed beauty of winter, I reflect on the journey from preparation to realization. A winter wonderland adventure is not just an escape; it’s a testament to the joy of embracing the season’s magic with careful planning and a spirit of exploration.

In the end, the snow-covered trail becomes a pathway to memories, and the winter wonderland transforms into a playground for those prepared to answer its call. With a heart full of gratitude and a camera full of snowy snapshots, I begin the journey back, knowing that the winter wonderland will always be there, patiently waiting for the next adventure.


winter mountain scene

Winter is a frosty time with snow layered forests and frozen lakes. All beautiful and stunning to behold, but also create a situation where proper winter adventure safety and etiquette is necessary. Lets discuss some of these clothing and gear essentials:

Essential Clothing Layers:

Thermal Base: Start with a moisture-wicking base layer to keep your body dry and regulate temperature. This is usually made out of nylon and polyester materials. Synthetic materials pull sweat and moisture away from the body. Cotton is not an ideal material choice for a base layer as it is more absorbent, no longer providing as an insulator.

Insulating Mid-Layers: Layer up with fleece or down to trap heat and provide additional warmth in freezing

winter time

temperatures.

Waterproof Outer Shell/Jacket: Shield against snow and wind with a durable, windproof and waterproof outer layer to stay dry and protected.

Wool Socks and Insulated Gloves: Keep extremities warm with high-quality wool socks and insulated, waterproof gloves.

    • Wool has natural insulating properties, even when wet. This means that even if your feet sweat or if the socks get damp, they will still retain some of their insulating ability, helping to keep your feet warm in cold temperatures.
    • Wool is excellent at wicking moisture away from the skin. This is crucial during winter hikes when your feet may sweat or if you encounter snow. By keeping moisture away from the skin, wool helps prevent discomfort, blisters, and the chilling effect of wet socks.
    • Wool is breathable, allowing air circulation around the feet. This helps regulate temperature, preventing overheating during periods of high activity and providing warmth during rest breaks or colder conditions.
    • Wool is soft and comfortable against the skin, reducing the likelihood of chafing or irritation during prolonged wear. The natural elasticity of wool fibers also provides a snug fit, preventing the socks from bunching up or sliding down.Toque and Neck Gaiter: Cover your head with a warm hat and protect your neck from the cold with a snug gaiter.

Gear Essentials:

Trekking Poles: Ensure stability and aid balance in challenging winter conditions. Along with some poles, some ice cleats (or crampons,  orice grips, or micro-spikes) are wonderful to have along a winter adventure hike.

Backpack with Essentials: Pack a well-organized backpack (ex: spare socks, spare gloves, map, compass, food & snacks, first aid, hydration, emergency blanket, multi-tool, rope, headlamp, cellphone & battery pack)

Portable Stove: Enjoy a hot meal midday with a compact foldable stove, a Kelly Kettle, a Jetboil or your favorite stove of choice. Nothing better on a winter day than to be able to have a hot meal.

Navigating Winter Trails:

Check Weather Forecast: Stay informed about changing weather conditions before embarking on your winter adventure. Regardless what the weather report says, be prepared for a storm. The mountains have an ever-changing weather pattern.

Map and Compass Skills: Hone your navigation skills for trailblazing through snowy landscapes, ensuring youFossil Falls, Aster Lake, Kananaskis can find your way in challenging conditions.

    • Take some time to familiarize yourself with how to read and use these seemingly archaic tools. Orient the map and understand the basics of contour lines. Consider having a route already mapped out, and mark your progress as you go.

Adaptability and Awareness: Embrace the unpredictable by staying alert and adapting to the evolving winter environment.

    • Be  ready to adapt to, and be aware of trail markers, animal tracks & animal signs, time of day/daylight, and the state of those you may be travelling with.

With these winter adventure essentials in your arsenal, you’re ready to traverse from frosty forests to frozen lakes. The beauty of winter awaits—layer up, pack smart, and immerse yourself in the breathtaking landscapes that the season has to offer. But first! Here are some additional essentials to consider.

Additional Winter Adventure Essentials:

Sunglasses and Sunscreen: Shield your eyes from the bright winter sun and protect your skin from its reflective rays on snow.

Portable Shelter: Be prepared for unexpected weather changes with a lightweight shelter or emergency bivy.

Extra Clothing Layers: Pack additional clothing layers to adjust to changing temperatures or in case of

Windproof, waterproof matches 20 pcs unexpected wet conditions.

Fire Starter Kit: Include waterproof matches or a reliable lighter for starting a fire in emergency situations.

High-Energy Snacks: Keep a stash of high-energy snacks like trail mix, energy bars, and dried fruits to stay fueled throughout the day.

Hydration System: Stay hydrated even in cold weather by carrying a hydration bladder or insulated water bottles. In winter, water becomes frozen, and finding water sources can be challenging. However, keeping a water-straw can also be handy to have in your pack.

Emergency Whistle: Ensure you have a loud, easily accessible whistle for signaling in case of an emergency.

Spare Batteries: Pack extra batteries for your headlamp, GPS, or any electronic devices you may be carrying.

Snow Probe and Shovel: If venturing into avalanche-prone areas, carry a snow probe and shovel for safety.

Communication Device: Bring a fully charged cellphone, a satellite communicator, or a two-way radio for communication in remote areas.

Know Your Limits: The most essential of all—know your personal limits and be willing to turn back if conditions become too challenging.

Remember, the key to a successful winter adventure lies not just in the gear you carry but in your ability to adapt, stay informed, and respect the dynamic nature of winter environments. Stay safe, enjoy the winter wonderland, and create lasting memories in the heart of the frosty wilderness!

winder scape of mountains reflecting in the lake

raspberries in the woods

Surviving in the wilderness requires not only finding shelter and water but also sourcing food. Knowing how to forage and hunt for sustenance is a helpful skill. In this article, we’ll explore various methods and specific examples to help you procure food in the wild.

Edible Plants:dandelions

Many wild plants are safe to eat, while others can be toxic. Learning to identify edible plants is essential for foraging. Some common examples include:

  • Wild Berries: Blueberries, blackberries, raspberries, and strawberries. They are easy to identify and rich in nutrients.
  • Dandelions: Dandelion leaves and roots are edible and can provide essential vitamins and minerals.
  • Cattails: These plants offer edible shoots, roots, and pollen. The shoots are a great source of carbohydrates, while the pollen can be used as a protein-rich supplement.


Insects:

Insects are a reliable source of protein in the wild. Some safe-to-eat insects include:

  • Grasshoppers: These insects are plentiful in many wilderness regions and can be roasted for a crunchy, protein-packed snack.
  • Ants: Ants can be collected and consumed for their protein content.
  • Earthworms: These are a good source of protein and can be found in moist soil.
    • Note: I would have to be at a very low point in my survival to resort to insect consumption. (I imagine Simba in the Lion King when he moves away from Pride Rock – “slimy yet satisying”). However, I do appreciate knowing that it is technically safe to do should I ever find myself in a situation where foraging to save my life was necessary!

Fishing:

If you have access to a water source, fishing can provide a consistent food source. Techniques to catch fishfishing include:

  • Improvised Fishing Gear: Craft a fishing pole using a long, flexible branch, fishing line, and hooks made from thorns or bone.
  • Traps: Construct fish traps using rocks to create a barrier, forcing fish into a confined area for easy catching.
  • Consider putting basic supplies in your emergency kit or pack: fishing line and a hook.
    • Do not forget to pack your patience!

Small Game Hunting:

Hunting small game animals is a valuable survival skill. Common animals to hunt include:

  • Squirrels: Use a sling or improvised bow and arrow for hunting squirrels (or rabbits).
  • Birds: Birds can be snared using simple traps or hunted with a slingshot.

Trapping:

Setting traps can provide a passive way to secure food. Examples include:

  • Deadfall Traps: These are heavy objects that crush the prey when triggered (ex: bumping the stick and the rock pile falls)
  • Snare Traps: Create snares with loops of cordage to catch animals as they pass through. (My son and his friend did this with a rope over a gopher hole in our campsite this past year, and I kid you not, it actually worked!)
  • Pitfall Traps: Dig a hole and cover with foliage. The concept is the animal would fall into the hole.

Water Purification:XStream water filter straw for the outdoors

Cooking:

Should you find yourself in the wilderness by choice, cooking food with a JetBoil or Kelly Kettle are excellent food sources. Be sure to have matches (and other applicable camping gear, like a knife) to more easily cook. Also, consider premade meal pouches and bars or snacks to avoid the need to forage for those bugs and other food sources.

In a wilderness survival scenario, knowing how to source food is important for your well-being. Remember to always be cautious when foraging and hunting, as misidentification or improper preparation can lead to illness. Consider reading books on food sources in your area, plant identification books, or other resources to educate yourself. With practice and knowledge, you can become proficient in sourcing food in the wild and increase your chances of surviving in challenging situations.