man walking through a snow storm

Natural disasters often steal our attention, yet amidst ‘the big ones’, numerous lesser-discussed catastrophes silently shape our world. This exploration takes us into discussion some lesser known natural disasters.

1. Dust Storms: The Silent Giants:

Dust storms, or haboobs, may not draw headlines like tornadoes or hurricanes, but these massive walls of dust, fueled by strong winds, can wreak havoc. Obscuring landscapes and causing respiratory issues, dust storms are a reminder that nature’s fury takes many forms.

road falling apart after a natural disaster

While less common in Canada to experience a severe dust storm (like they would more regularly in the Saharan Desert), areas with significant human activities, such as agriculture, deforestation, and construction, can experience dust storms. For example, the Dust Bowl in the United States during the 1930s was a result of poor land management practices combined with severe drought conditions.

  • Combine a drought and a wind storm, and a dust storm is highly possible.

2. Sinkholes: Nature’s Unseen Cracks:

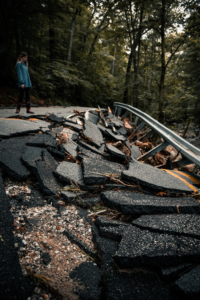
Beneath our feet, the hidden danger of sinkholes lurk. Triggered by factors like heavy rainfall or human activities, these sudden collapses can swallow buildings or roads, revealing the delicate balance between what we build and the Earth’s forces.

https://www.cbc.ca/news/canada/calgary/sinkhole-emergency-calgary-road-repairs-1.6852642 Here is a CBC news article giving example of a sink hole appearing in SE Calgary, Alberta May 2023.

https://www.wctrib.com/news/4-missing-after-canadian-home-falls-in-sinkhole And here is a huge, and tragic sink hole example (from the West Central Tribune) in Saint-Jude, Quebec in 2010.

3. Volcanic Hail & Ash: Nature’s Fiery Fury:

Volcanic hail, or lapilli, is a phenomenon where small volcanic rock fragments rain down during an eruption. Beyond flowing lava, eruptions bring dangerous projectiles, causing damage to infrastructure and human safety. Volcanic hail paints a vivid picture of the impact of a volcanic event.

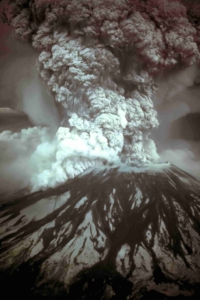
The eruption of Mount St. Helens in Washington (1980) generated a massive ash cloud that reached high into the atmosphere. The ash was composed of fine rock and mineral particles that were pulverized during the eruption. The ash cloud traveled for hundreds of miles, affecting ground traffic, air traffic, weather patterns, and visibility.

Since the 1980 eruption, Mount St. Helens has remained active, with ongoing geological monitoring. It serves as a valuable natural laboratory for scientists studying volcanic processes and ecosystem recovery.

              • The ash cloud from Mount St. Helens traveled eastward across the United States & Canada and travelled significant distances in the Northern Hemisphere
              • The ash cloud posed a severe threat to aviation as it can damage aircraft engines and other critical components. In response to the eruption, significant airspace restrictions and flight cancellations were implemented.
              • The ashfall had a profound impact on the local ecosystem, affecting vegetation, water bodies, and wildlife. However, over time, the area around Mount St. Helens has undergone a process of ecological recovery.
Image by Austin Post – Mount St. Helens, Washington May 18, 1980 Eruption Images, Public Domain, https://commons.wikimedia.org/w/index.php?curid=3157557


4. Drought: Earth’s Parched Embrace:

Drought, a slow and insidious disaster, silently grips regions, causing water scarcity and agricultural crises. The prolonged absence of rainfall or lack of enough winter snowfall reveals the vulnerability of ecosystems and challenges our ability to adapt to changing climate patterns.

Of course, the most famous drought was during the “Dirty 30’s”, though that was not the last one our Country has experienced. Would it surprise you to know that we are (as of Dec 2023) currently experiencing drought conditions?

https://agriculture.canada.ca/en/agricultural-production/weather/canadian-drought-monitor/current-drought-conditions  The Agriculture section on the Canada.ca website portrays this:

5. Landslides and Avalanches: Nature’s Cascading Fury:

Landslides and avalanches, triggered by heavy rainfall or snowfall, pose significant threats to mountainous regions. Their sudden and destructive nature highlights the need for careful land-use planning and early warning systems in vulnerable areas.

In our own Rocky Mountains and all of Canada’s vast mountain regions, we must be well educated on avalanche safety. If you plan to venture out hiking, skiing, or any other winter sport of choice, consider taking an avalanche safety course and thoroughly educating yourself

Here are some landslide and avalanche examples from within Canada:
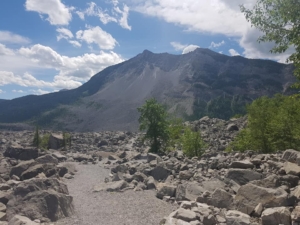
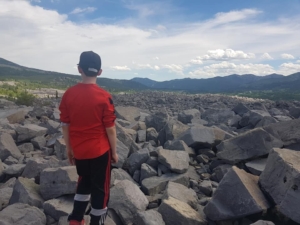
  • Frank Slide (1903) – Alberta:
    • One of the most famous landslides in Canadian history occurred in the town of Frank, Alberta, in 1903. A massive rockslide, known as the Frank Slide, buried part of the town under millions of tons of limestone rock from Turtle Mountain. The slide was triggered by the unstable geological formations in the area.
    • These two photos are of a trip we took through the Crowsnest Pass to see it. I can honestly say that no matter how many times I walk through the rubble, I am astounded by the magnitude of it.

  • Hope Slide (1965) – British Columbia:
    • The Hope Slide is one of the largest landslides in recorded Canadian history. It occurred in the Nicolum Valley near Hope, British Columbia, burying a stretch of Highway 3. The slide was triggered by heavy rainfall and the instability of the underlying rock formations.
  • Mount Meager Landslide (2010) – British Columbia:
    • In 2010, a massive landslide occurred on Mount Meager in British Columbia. The debris flow traveled down Capricorn Creek, creating a natural dam on Meager Creek. The event raised concerns about the potential for glacial outburst floods and impacted the landscape in the region.
  • Rogers Pass Avalanches (Multiple Events) – British Columbia:
    • Rogers Pass in the Selkirk Mountains of British Columbia is known for its history of avalanches. The area experiences frequent avalanche activity, and extensive avalanche control measures are in place to ensure the safety of the Trans-Canada Highway and the railway that pass through the region.
  • Dawson Landslide (2015) – Yukon:
    • In 2015, a large landslide occurred near the community of Dawson City in Yukon. The slide blocked the flow of the Yukon River, causing concerns about potential flooding. The incident highlighted the dynamic nature of the northern landscapes and the potential for geomorphic changes.

6. Blowing Snow, Freezing Rain, and Fog: Atmospheric Alchemies:

Blowing snow, freezing rain, and fog are atmospheric phenomena that can create hazardous conditions forwinter driving conditions 
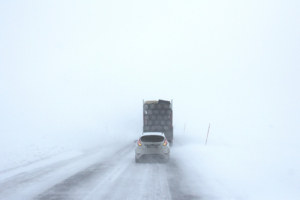
transportation and daily life. These seemingly subtle events underscore the impact weather can have on our daily activities, demanding respect for the forces of nature.

Pro-Tip: If you do not have to be on the roads during these conditions, it is best to avoid it. I would hazard a guess that insurance companies would also give the same advice!

There are far too many examples of these 3 conditions in our wonderous Canadian homes to share. In fact, if you have an example with a lesson learned, please email it to me at BridenAcademy@bridensolutions.ca – if I get enough of them, I will create a post sharing all our personal “Lessons Learned”

7. Smoke: Beyond the Campfire

Fort McMurray Wildfire Evacuation

Smoke, often accompanying wildfires, can blanket vast areas, affecting air quality and visibility. Strong winds become the silent helpers, spreading fires and intensifying their impact. I cannot remember a year in the last 5 that we have not had wildfire smoke in our forecast. Some years worse than others of course.


Wildfires: Lets first learn about their purpose: while often seen as destructive events, they play several important roles in ecosystems and can have both short-term and long-term ecological impacts.

  • Wildfires are a natural and essential part of the ecological cycle. Some plant species have evolved to be fire-dependent, relying on wildfires to clear away dead vegetation, open up space for new growth, and stimulate seed germination.
  • Wildfires break down organic matter and release nutrients back into the soil. This process, known as mineralization, replenishes the soil with essential nutrients like nitrogen and phosphorus. The enriched soil can support the growth of new vegetation.

Knowing that wildfires (particularly the non-human started ones, but that’s an entirely different post) are good for ecosystems, does not make the smoke and air quality easy for us oxygen breathing humans.

Educate yourself on the air quality index found HERE to keep yourself safe, and follow proper protocol provided by your local authorities.

8. Cold Temperatures and Wind Chill: Nature’s Temperature Extremes:

Extreme cold temperatures challenging us to cope with the diverse climates that Canada can unleash. Best practice for cold temperatures and wind chill include proper outer wear, avoiding exposure of skin, and limited time in the elements.

HOW WIND CHILL WORKS:

  • When wind blows in cold conditions, it intensifies the perception of coldness on exposed skin, a phenomenon known as wind chill. Wind chill is more than just a subjective feeling – it reflects the increased rate of heat loss from the body. As wind speed rises, it strips away the thin layer of warm air near the skin, accelerating the cooling process.
  • This heightened cooling effect not only makes the air feel colder but also increases the risk of frostbite and hypothermia. In regions prone to severe winter weather, wind chill advisories and warnings are crucial for public safety, guiding individuals to take precautions such as dressing in layers, covering exposed skin, and limiting outdoor activities to prevent cold-related health issues.

Our Territories (Yukon, NWT & Nunavut) hold the overall coldest temperatures on a year-to-year average basis, but some of the provinces sneak in there with some particularly cold moments on occasion! Wikipedia mentions a few documented -60C moments over the past 100+ years. Brrr!

Conclusion:

In the intricate web of natural disasters, these lesser-known events weave a narrative of Earth’s complexity. By understanding and respecting the full spectrum of calamities, we can better prepare for the unseen forces shaping our world.

We did not discuss specifically what to do, or how to get through these disasters in this article. My hope however is for everyone to see that a disaster does not need arrive in the form of a tornado, a flood, or an earthquake to be a disaster. A disaster by definition is a sudden, catastrophic event that causes significant disruption, destruction, and/or distress, and I’ll add to that, often unexpected.

Nature’s surprises are boundless, and our journey to move forward through it is so much easier if we are prepared. Knowledge is power my friends. We are on the right track. Have a great day!

When it comes to outdoor adventures, one brand has become synonymous with convenient, delicious, nourishing, and allergy friendly meals—Mountain House. Renowned for its extensive product line, Mountain House has been a trailblazer in the world of freeze-dried and dehydrated meals. Let’s explore the taste of adventure that Mountain House offers. Click here to peruse the variety of choices we carry!

A Legacy of Excellence: Origin Story

Founded in Oregon in 1968, Mountain House has spent over five decades perfecting the art of creating lightweight, easy-to-prepare, and satisfying meals for adventurers. Originally focused on serving the needs of the United States military, the brand has since expanded to become a staple for outdoor enthusiasts on their journeys.

Freeze-Dried Brilliance:

At the heart of Mountain House’s success lies the innovative freeze-drying process. This technique involves removing moisture from the ingredients without compromising flavor, texture, or nutritional value. The result is a lightweight, shelf-stable meal that retains its original taste and nutritional goodness.

Diverse Menu Options:

Mountain House offers an array of meal options to suit preferences and dietary needs.  Popular choices include Beef Stroganoff, Chicken Teriyaki with Rice, and Biscuits and Gravy for a comforting start to the day. With vegetarian, gluten-free, and dairy-free options available, Mountain House ensures there’s something for everyone around the campfire.

Convenience at its Core:

Lightweight and easy to pack, these meals require minimal preparation—just add hot water, wait a few minutes, and enjoy a piping hot, flavorful dish. This simplicity makes Mountain House an ideal choice for outdoor enthusiasts who prioritize efficiency without compromising on taste.

Emergency Preparedness:

Beyond catering to outdoor adventures, Mountain House has earned a reputation as a go-to for emergency preparedness. Their long shelf life and compact packaging make them a reliable choice for individuals and families preparing for unexpected situations. Having a stash of Mountain House meals ensures preparedness with nourishing and familiar flavors.

Conclusion:

Mountain House stands as a testament to the marriage of culinary excellence and outdoor adventure. They offer a product line with a diverse menu of flavors and allergen friendly choices. As you embark on your next journey, consider bringing along the taste of adventure with Mountain House—a brand that understands the true essence of savoring life in the great outdoors.

Have you tried Mountain House pouches? Email us your favorite flavor, and what you purchase them for at BridenAcademy@BridenSolutions.ca

food storage items sealed in the pantry

The Importance of Food Rotation

Properly rotating your food supplies in the pantry serves several essential purposes:

  1. Maintaining Freshness: Non-perishable items like canned goods, grains, and pasta have a shelf life. Rotating your supplies ensures that you use older items before they expire, helping you maintain freshness and quality.checklist
  2. Minimizing Waste: Food waste is a significant issue worldwide. Rotating your pantry items helps reduce waste by ensuring that you consume products before they go bad.
  3. Emergency Preparedness: In case of unexpected events or disasters, a well-organized pantry with regularly rotated items ensures you have access to nutritious food, making it a crucial aspect of disaster preparedness.
  4. Savings: By using older items first, you can save money by avoiding unnecessary food purchases and making the most of what you already have.

Tips for Proper Pantry Rotation

  1. First In, First Out (FIFO): The golden rule of pantry management is FIFO. When stocking your pantry, place newer items behind the older ones. When you use products, take from the front, so you’re always consuming the oldest items first.
  2. Create an Inventory: Consider maintaining a pantry inventory list. This can be a simple spreadsheet or even just a handwritten list of items on a paper or whiteboard. Update it each time you add or use items. An inventory can help you keep track of what you have and need.
  3. Organize by Category: Group similar items together, such as canned vegetables, pasta, sauces, and grains. This organization makes it easier to find what you need and prevents items from getting lost in the back of the pantry.
  4. Regularly Rotate and Reorganize: Set aside time periodically to reorganize your pantry. This might be a weekly, monthly, or seasonal task. Check for expired items, refresh your inventory list, and adjust the organization as needed.
  5. Donate or Share Excess: If you find that you have items that you won’t be able to consume before they expire, consider donating them to a food bank or sharing with friends and family. It’s a win-win, as you reduce waste and help others in need.kitchen pantry
  6. Invest in Quality Storage Containers: Using airtight, clear containers can help prolong the shelf life of ingredients like grains, cereals, and spices. Plus, they make it easy to see what you have at a glance.
  7. Learn About Shelf Life: Different pantry items have varying shelf lives. Educate yourself about the typical shelf life of commonly used items so that you can plan your rotations accordingly. See my article about this here.


Properly managing your pantry by rotating food supplies is a simple but effective way to maintain food freshness, minimize waste, and be better prepared for emergencies. By following the FIFO method, regularly checking expiration dates, and staying organized, you can make the most of your pantry items while saving money and reducing food waste.

kitchen pantry

Here are 3 questions for your food storage to consider: What are my long term goals? Have I diversified my food choices? Am I prioritizing proper food storage conditions?

1. What Are My Long-Term Goals?

Consider the bigger picture when it comes to food storage. Are you preparing for short-term disruptions or aiming for a more extended period of self-sufficiency? Understanding your long-term goals will shape the types of foods, preservation methods, and storage containers you choose. Some things to consider include:

  • Are you building a robust emergency supply or creating a sustainable pantry?
  • Do you have any allergens or dietary considerations to take into account?
  • What kind of storage space is available to me?
  • How does the budget look for starting, continuing, or expanding my storage?
  • What emergency scenarios are a possibility in my region?

2. Have I Diversified My Food Choices?

Variety is not just the spice of life; it’s also a cornerstone of smart food storage. Ask yourself if your provisions encompass a diverse range of nutrients, flavors, and textures. Strive for a well-rounded selection that meets your nutritional needs while providing culinary enjoyment. Consider including shelf-stable fruits, vegetables, proteins, and grains to create a versatile and satisfying array of options. Diversification ensures that your stored food not only sustains you but also contributes to a well-balanced and enjoyable diet.

Let us help you! We at Briden Solutions are trained for this very purpose.

Pro-tip: Store food you will eat! For example: not a single human being in my household will eat beets. It would be a silly item to have in my food storage, regardless the health benefits they may provide us.

3. Am I Prioritizing Proper Storage Conditions?

The longevity and quality of your stored food depend heavily on the conditions in which it is kept. Evaluate your storage space—whether it’s a pantry, basement, or emergency shelter—and ensure it meets the necessary criteria. By prioritizing optimal storage conditions, you safeguard the nutritional value and taste of your stored food for the long haul.

  • Keep an eye on factors such as temperature, humidity, and exposure to light.
  • Invest in airtight containers, moisture absorbers, and proper shelving to enhance the shelf life of your provisions.
  • Rotate your food storage, and pay attention to Shelf Life dates. Utilize FIFO (First in first out)
  • Watch out for those pests! If you have #10 cans or buckets, it’s less of a problem than pouches
Conclusion:

Asking these three fundamental questions about your food storage practices empowers you to make informed decisions that align with your goal and preferences. Whether you’re curating an emergency kit, stocking up for outdoor adventures, or enhancing your daily pantry, thoughtful consideration of your long-term goals, food variety, and storage conditions ensures that you’re well-prepared for whatever comes your way. Nourishment for tomorrow begins with asking the right questions today—because, in the realm of food storage, foresight is as essential as the provisions themselves.

splash of water

For years, bleach had been a go-to method for water purification. As our understanding of water safety evolves, and our technology advances, it is evident that bleach is no longer the best approach. Lets look beyond bleach and explore alternative purification methods:

Effectiveness Against Contaminants:

  • Bleach is primarily effective against bacteria and viruses but may fall short when dealing with other contaminants such as parasites, heavy metals, and chemical pollutants.
  • In scenarios where water sources are prone to contaminants, bleach may not provide protection. Certain waterborne threats, like cryptosporidium or lead, may persist despite the use of bleach.
What is Cryptosporidium you ask? I didn’t know either! Lets learn together:

Cryptosporidium is a microscopic parasite that can cause a gastrointestinal illness known as cryptosporidiosis. This parasite is a protozoan and belongs to the genus Cryptosporidium. The most common species that infects humans is Cryptosporidium parvum. (Another word to describe parasites is “protozoa” or “protozoan“)

  • Cryptosporidium is found in water, food, soil, or surfaces that have been contaminated with the feces of infected animals or humans. The parasite has a protective outer shell that allows it to survive for long periods outside the body and makes it resistant to many common water treatment methods.
  • Infections with cryptosporidium cause symptoms such as watery diarrhea, stomach cramps, nausea, vomiting, and fever.
  • Preventing cryptosporidium infection involves good hygiene, avoiding contaminated water, and proper food safety measures. Boiling water, using water filtration systems, and maintaining overall cleanliness are preventive measures against cryptosporidium and other waterborne illnesses.

Impact on Microbial Balance:

  • Bleach is a broad-spectrum disinfectant, meaning it can kill a wide range of microorganisms. This includes both harmful pathogens and beneficial microbes. In situations where maintaining a healthy microbial balance is important, such as in natural water sources or in the gut microbiome, the use of bleach might be reconsidered.

What is a Microbe you ask? 

The terms “microbe” and “microbial” refer to microscopic organisms, which are too small to be seen with the naked eye. Microbes play essential roles in various ecosystems, and they can be found in environments ranging from soil and water to the human body.

    • Microbes can be unicellular (single-celled) or multicellular and include a wide variety of life forms. Bacteria, viruses, fungi, and protists are all examples of microbes.

Microbes play roles in ecological processes, including nutrient cycling, decomposition, and symbiotic relationships with other organisms. Some microbes are beneficial, such as those involved in food fermentation and nutrient recycling, while others can be harmful, causing diseases in plants, animals, and humans.

What does this mean for us? For balance in our lovely human bodies, we need a variety of microbes, and bleach was discovered to also eliminat the good.

Cons to Bleach:

Residual Taste and Odor:
  • The taste and odor of water treated with bleach can be off-putting, making it less palatable for consumption.
  • Unpleasant taste and odor can discourage individuals from drinking an adequate amount of water, leading to potential dehydration and health issues. This is particularly significant in emergency situations where access to clean water is crucial.
Health Concerns and Dosage Precision:
  • Achieving the right bleach concentration for water purification requires precision and adherence to specific guidelines. Excessive bleach amounts can pose health risks.
  • Overusing bleach can introduce harmful chemicals into drinking water, leading to adverse health effects. The precision required in measuring bleach concentrations can be challenging, especially in emergency situations where resources may be limited.
Environmental Impact:
  • The production and disposal of bleach contribute to environmental concerns, including the release of harmful byproducts.
  • As our awareness of environmental sustainability grows, it’s crucial to consider the ecological footprint of water purification methods. Bleach, with its manufacturing and disposal impacts, may not align with environmentally conscious practices.

Availability of Safer Alternatives:

  • Safer and more advanced water purification methods are now widely available, offering comprehensive protection against a broader range of contaminants.
  • With advancements in water purification technologies, relying solely on bleach may be an outdated approach. Alternative methods, such as filtration, UV treatment, and advanced purifiers, provide more reliable and user-friendly options.
Lets discuss a few of those options:


Sagan life aquabrick water filter


The Aquabrick Water Filtration System will safely filter out 99.99% of virus for up to 550 gallons; and safely filter out 99.9999% bacteria and 99.99% of giardia and cryptosporidium for up to 700 gallons from highly contaminated water.


LifeStraw: The ultralight backpack and travel-friendly squeeze water bottle makes contaminated water safe to drink by removing bacteria and parasites, preventing the majority of waterborne disease. T

he LifeStraw has unlimited shelf life.

The membrane microfilters to 0.2 microns and removes:

• 99.999999% of bacteria (including E. coli)
• 99.999% of parasites (Giardia, Cryptosporidium, etc.)
• 99.999% of microplastics


boiling water


Boiling water at a rolling boil (100 degrees Celsius) for at least one minute (or three minutes at higher altitudes) kills or inactivates a broad range of pathogens, including bacteria, viruses, and parasites.

The heat disrupts the cellular structures and DNA of microorganisms, rendering them unable to cause infections or diseases. Boiling water does not guarantee removal of chemical contaminants if that is a concern.


While bleach can still be a tool for water purification, especially in emergency situations, advancements in water treatment technologies have led to the development of alternative methods that address some of the limitations associated with bleach. Filtration systems, boiling, UV treatment, and advanced purifiers offer more targeted and reliable approaches to water purification, often without the drawbacks associated with bleach. As a result, the choice of water purification methods depends on the specific context, available resources, and the desired level of water quality. Happy purifying!

splash of water

Ever wonder what happens to your tap water before it hits your glass? Water is an essential component of our daily lives, but not all water is created equal. When it comes to ensuring the water we consume is safe and clean, terms like “purification” and “filtration” often pop up. While these concepts might sound similar, they address distinct processes in the realm of water treatment.

pouring clean water into a class

Water Filtration: The Cleanup Crew

Think of water filtration like a giant sieve for your agua. It’s all about catching the visible stuff that shouldn’t be there – think tiny rocks, dirt, and maybe even a rogue leaf or two. Filtration is a foundational process, diligently addressing both visible and microscopic impurities.

  1. Activated Carbon:
    • Many filtration systems incorporate activated carbon as a key component. Activated carbon is highly porous and possesses a large surface area. As water flows through, the activated carbon attracts and adsorbs impurities, including organic compounds, chlorine, and certain chemicals. This stage significantly improves the taste and odor of the water.
  2. Sediment Filters:
    • Positioned as the initial barrier, sediment filters function as coarse screens, efficiently capturing larger particles like sand and debris. This preliminary filtration ensures the aesthetic clarity of the water.
  3. Ceramic Filters:
    • Some filtration systems incorporate ceramic filters or microfiltration membranes with tiny pores that block the passage of microscopic contaminants, including bacteria and protozoa. This step enhances the microbiological safety of the water.

Filter styles such as the ceramic filters explained above, or the AquaBrick water filtration system serve dually as filters & purifiers.

Water Purification: The Microbe Busters

Now, let’s talk about water purification – the germ-killing squad: a more comprehensive and chemical-oriented process. Purification goes beyond merely sieving out the visible impurities; it’s about tackling invisible threats like bacteria, viruses, and other harmful microorganisms that can turn a refreshing sip into a health hazard.

In the world of water purification, the most simple method is boiling water.  Other methods include purification tablets, chlorination, or UV treatment (Ultraviolet  light disrupts the DNA of bacteria, viruses, and other microorganisms, rendering them inactive and preventing their reproduction).

Pro-tip: I recommend keeping a package of water purification tablets with you while hiking, traveling, and in your 72 hour kits. It’s an added layer of protection when drinking water outside of certified safe drinking sources. Be sure to follow the packaging instructions!

Choosing the Right Defender – Filtration or Purification?

XStream water filter straw for the outdoors

So, which one do you need, and when?  If your water looks a bit muddy or has floaty bits, a filter will help that, and as mentioned above will also purify depending on the filter specs. Purification tablets are appropriate if your water is clear of debris, from a flowing water source for example, but you’d like to chemically treat it in case of any bacteria or viruses.

Bottom Line: Sip Safe, Stay Cool

Simply put…

Filters: filter or sieve impurities (some visible, some not)
Purifiers: chemical or advanced technological process to remove harmful microorganisms

So, the next time you savor a glass of water, you can appreciate the silent guardians – whether they be filters or purifiers – ensuring that each sip is a refreshing and safe experience. Stay hydrated, stay informed!

pets at home

Pets are not just animals; they are cherished members of our families. As responsible pet owners, it’s our duty to ensure their safety and well-being, especially in times of emergencies or disasters. This article delves into the aspects of pet preparedness, catering to a wide range of common household pets, including dogs, cats, fish, rabbits, reptiles, and more. By being proactive and informed, you can help protect your beloved companions when the unexpected occurs, whether that be evacuation, or being home-bound.

Dogs and Cats

friends

  1. Identification: Ensure your dogs and cats have well-fitted collars with up-to-date ID tags, including your contact information. Additionally, consider getting them microchipped to increase the chances of a safe return if they get lost.
  2. Emergency Kit: Prepare a comprehensive pet emergency kit. This kit should include an ample supply of pet food, water, medications, first-aid supplies, leashes, and carriers. Don’t forget to pack some of your pet’s favorite toys or blankets to provide comfort and familiarity during trying times.
  3. Evacuation Plan: Practice evacuation routines with your pets, making sure they are familiar with their carriers or travel crates. Be aware of pet-friendly shelters or hotels in your area, and have a list of their contact information. Knowing where you can take your pets during an emergency will alleviate your stress.
  4. Medical Records: Maintain copies of your pets’ medical records, including vaccination records, medications, and your veterinarian’s contact information. These records can be important if your pets require medical attention during a disaster.
  5. Safety During Disasters: During severe storms or disasters, keep your pets indoors and away from windows, glass doors, and other breakable items. Use calming techniques, such as soft music or a favorite toy, to help reduce their anxiety during noisy or chaotic situations.
  6. Pet-Proofing: Just as you would childproof your home, pet-proofing helps to keep your furry friends safe. Secure hazardous materials, chemicals, and any other dangers that your pets might access, particularly during a crisis.

Fish

fish in aquarium

  1. Battery-Powered Aerator: For aquarium owners, investing in a battery-powered aerator is a wise choice. This device can help maintain oxygen levels in the water if a power outage disrupts your filtration system.
  2. Fish Food & Supplies:  Keep appropriate chemicals and food well stocked. Alternatively keep multi-day fish feeders in stock in to be able to leave the fish home unattended should evacuation be necessary.
  3. Backup Power Source: Consider having a backup power source, like a generator, to keep your aquarium’s filtration system operational during extended power outages.
  4. Emergency Transport: Be prepared for the possibility of evacuating with your fish. Have a secure container or bucket on hand for transporting them. Ensure it has a tightly fitting lid to prevent spills and can maintain the water temperature. Adequate oxygen supply is essential, so include a battery-operated air pump if needed.

Rabbits

bunny rabbits eating clover

  1. Hutch Security: Ensure your rabbit’s hutch or cage is sturdy and well-anchored. It should be able to withstand strong winds and potential flooding. Elevating the hutch off the ground can help prevent water damage.
  2. Food and Water: Store ample food, water, and bedding for your rabbit in airtight containers. Ensure you have a supply of hay, pellets, and fresh greens. Keep their food and water in a safe, accessible location during an emergency.
  3. Comfort Items: Rabbits are sensitive to changes and stress. It’s important to provide familiar toys and bedding to keep them comfortable during disruptions. A sense of security can go a long way in calming your pet rabbit.

Reptiles

green snake

  1. Portable Enclosure: Reptiles living in terrariums or enclosures will require a secure, portable enclosure for transport during evacuations. Keep disposable hand warmers, rice bags, or hot water bottles available for temporary heat sources. Keep necessary food, vitamins, water misters, etc handy to grab and go.
  2. Temperature Control: Maintaining the appropriate temperature for your reptiles is vital, especially during power outages. Be ready to use battery-operated heat sources, heat packs, or hot water bottles wrapped in towels to regulate their habitat’s temperature.
  3. Clean Water & Food: Keep a clean, leak-proof container with water and food for your reptiles during an emergency. Regularly change the water to prevent contamination and provide fresh, clean water to keep your pets healthy.

Other Common Pets

hamster family petsblue budgie pet

  1. Birds: For bird owners, have a travel cage or carrier ready for your avian friends. Ensure it’s secure and well-ventilated. Covering the cage during transport can provide comfort to your birds during stressful situations.
  2. Hamsters and Small Rodents: Small mammals like hamsters should have a secure travel cage with sufficient bedding, food, and a water bottle. Ensure they have a familiar, comfortable environment during transport.
  3. Guinea Pigs: Guinea pigs require ample hay, pellets, and fresh water. Be prepared with extra supplies, as well as a secure, well-ventilated travel carrier for your guinea pigs.
  4. Ferrets: For ferret owners, have a travel cage or crate ready for your furry companions. Ensure they have access to food and clean water during evacuations to keep them comfortable and secure.

Conclusion

Pet preparedness is an integral component of disaster planning for pet owners. The first step is thinking about what this plan could look like! By adhering to these guidelines and being proactive in your approach to pet safety, you can help ensure the well-being of your pets during challenging and unexpected situations. Don’t wait until disaster strikes; take the necessary steps to keep your cherished companions safe, secure, and comfortable during times of crisis. Your dedication to their safety is a testament to the strong bond between pets and their loving owners.

flashlight at night looking at the stars along the river

In a world where the unexpected can happen at any time, being prepared is key. Lighting is a fundamental aspect of preparedness, as it ensures you can see, work, and navigate in any situation, especially in our Canadian winter season, when our daylight is shortened. This article delves into lighting hacks, offering creative solutions to illuminate your path to survival.

1. Homemade Oil Lamps

Oil lamps are a reliable and cost-effective lighting solution. You can make your own by using a glass container, such as a mason jar, filling it with vegetable oil, and placing a cotton wick inside. Trim the wick to the desired length, and light it. This DIY oil lamp provides a steady, long-lasting flame that can light up a room.

  • Glass container (e.g., mason jar)
  • Vegetable oil
  • Cotton wick
  • Scissors

2. Solar-Powered Lights

Harness the power of the sun with DIY solar lights. Purchase solar garden lights, and repurpose the solar panels and LEDs. You can create custom solar-powered lighting solutions for emergencies, such as portable lanterns and path lights.

  • Solar garden lights

3. Altoids Tin Candles

Altoids tins can be transformed into compact and efficient candles. Melt wax and pour it into the tin, adding a wick to create a small, portable candle that can burn for hours. These tin candles are easy to store and ideal for lighting small spaces during power outages or on the go.

  • Altoids tin
  • Wax (e.g., old candles or wax melts)
  • Wick
  • Double boiler or microwave-safe container

3 wick survival candle

Or consider our 36 hour candle.

4. Battery-Powered LED Hacks

Enhance your battery-powered LED lights with DIY modifications. You can amplify their brightness and distribution by attaching them to reflective surfaces, like aluminum foil or small mirrors. This hack ensures more efficient use of your battery-powered lighting during an emergency.

  • Battery-powered LED lights
  • Aluminum foil or small mirrors
  • Adhesive or tape

5. Glow Stick Cluster Lamps

Glow sticks are a fun and versatile DIY lighting option. Cluster several glow sticks together using tape or string, and hang them from a central point. This creates a unique and effective overhead lighting source. In a pinch, you can attach them to the brim of a hat for hands-free illumination.

Safe, reliable light illumination lightstick

6. Vegetable Can Lanterns

Repurpose empty vegetable cans into lanterns. Use a hammer and nail to create decorative patterns or designs on the can’s surface. Place a candle or battery-operated LED light inside for a charming and functional lantern that can light your way in the dark.

  • Empty vegetable cans
  • Hammer and nail for decoration
  • Candle or battery-operated LED light

7. Crayon Candles

In an emergency, crayons can become makeshift candles. Remove the paper wrapper and light the crayon as you would a candle. One crayon can burn for up to 30 minutes, providing you with essential illumination in a pinch.

  • Crayons (remove paper wrapper)
  • Lighter or matches

crayon box

8. Reflective Tarp Tents

Reflective emergency blankets or tarps can be used to create makeshift tents or shelters. By directing a light source, such as a flashlight or candle, onto the reflective surface, you can amplify and disperse the light throughout your shelter, creating a well-lit environment.

  • Reflective emergency blanket or tarp
  • Light source (flashlight, candle, or lantern)

9. Rechargeable Solar-Powered Mason Jar Lights

Combine the simplicity of mason jars with the convenience of solar-powered lighting. Attach a solar-powered lid to a mason jar and let it charge during the day. At night, you have a portable, eco-friendly, and reusable light source.

  • Mason jar with lid
  • Solar-powered lid
  • Sunlight for charging

10. Classic Campfire

Of course, building a fire offers a natural heat and light source. It has been a reliable source of light for centuries, offering practicality and comfort in various settings.

Conclusion

Lighting hacks fare not only practical but also fun to create. By incorporating these inventive solutions into your emergency preparedness plan, you’ll be better equipped to shine a light on survival during power outages, camping trips, or other unexpected situations. With a little creativity and resourcefulness, you can illuminate your path to safety and self-reliance.


bears climbing on the rocks

Bear Encounter Etiquette:

Bear etiquette is a set of guidelines and behaviors designed to minimize human-bear conflicts, promote safety, and ensure the well-being of both people and bears. Whether you’re exploring bear country for recreational purposes or living in an area with bear populations, understanding and practicing bear etiquette is essential.

Kyla’s Rule #1: Expect the unexpected! Stay open minded, humble, and receptive to learning about bear safety. Just like us humans, every bears behavior and personality is different.

Parks Canada has up-to-date information as an added resource.

white bear

Make Noise:
  • Bears can be startled if suddenly encountered, leading to defensive reactions. Make noise, especially in areas with dense vegetation or limited visibility, to alert bears to your presence.
  • How? Clap your hands, talk loudly, or sing. Let bears know you’re there, giving them the opportunity to avoid you.
Travel in Groups:
  • Bears are less likely to approach or feel threatened by larger groups of people.
  • Travel in groups of two or more when hiking or camping in bear country. Some hiking trails post to travel in groups of 4 or more – “know before you go”.
Proper Food Storage:
  • Minimize the likelihood of bears associating humans with food, which can lead to dangerous encounters.
  • Secure Food and Garbage: Use bear-resistant containers, bear canisters, or hang food in bear bags away from the campsite.

In my Cochrane neighborhood every October we have bears looking for food in preparation for winter. The Town asks us to store our garbage bins indoors, and to consider not leaving Halloween pumpkins overnight. Ff we have fruit trees in our yards, we are asked to clean up fallen fruits to prevent attracting these magnificent animals.

Carry Bear Spray:
  • Bear spray is a proven deterrent and can be effective in deterring aggressive bears.
  • Holster Placement: Keep bear spray in an easily accessible holster on your belt or front of backpack.
  • Maintain 100 Yards (91 Meters): Stay at least 100 yards away from bears, especially mothers with cubs.
Respect Bear Habitat:
  • Reducing human impact on bear habitats helps maintain natural behaviors and minimizes conflicts.
  • Stay on Trails: Stick to established trails to avoid disturbing sensitive habitats.
Avoid Mother Bears with Cubs:
  • Reducing the likelihood of a defensive encounter with a protective mother, as mother bears are very protective of their young!
  • If you see cubs, or a bear with cubs, give them a wide berth and alter your route.
Report Bear Sightings:
  • Contribute to wildlife management efforts and helping authorities track bear movements.
  • Contact Local Authorities: Report any bear sightings or encounters to local wildlife authorities. They need to know for population monitoring, behavioral studies, public safety, conservation efforts, and emergency response – just to name a few.

Understand Defensive vs. Aggressive Behavior:

bear

  • Assess the Situation: Determine the bear’s behavior. Calmly back away. Speak in a calm voice to identify yourself as a human.
  • Avoid Direct Eye Contact: Bears may interpret direct eye contact as a threat or challenge. Do not stare directly at the bear; instead, glance periodically.
  • Back Away Slowly: Back away slowly and avoid turning your back on the bear.

black bear

Recognize Signs of Bear Behavior:

Charging: Ears laid back, head lowered

    • Stand your ground and be prepared to use your bear spray.
    • A bear may bluff charge (or mock charge) and stop short. The bear is trying to get you to leave. Avoid turning and running.

Vocalizations: Huffing, growling or woofing sounds

    • These vocalizations may indicate discomfort or aggression. Speak calmly to identify yourself as human and avoid aggressive movements.

Paw Swatting or Slapping: Swatting the ground or objects with the paws

    • Retreat slowly without turning your back. Maintain looking toward the bear if possible.

Stiff and Direct Approach:  A bear approaching directly with a stiff and deliberate gait may be displaying aggression.

    • Stand tall, speak calmly, but firmly, and prepare to use bear spray if necessary.

Retreating or Moving Away:

    • Defensive Sign: A bear actively avoiding confrontation by moving away is likely exhibiting defensive behavior.
    • Allow the bear to retreat. Do not pursue or follow it.

Note that these behaviors are not always black and white, and the context of the situation matters. A bear’s behavior can change based on factors such as the presence of cubs, the bear’s age, environmental conditions, and the bear’s overall disposition. Always prioritize safety, avoid direct eye contact, and speak calmly in a non-threatening manner. If you have bear spray, be ready to use it if a bear approaches aggressively.

bear

Using Bear Spray:

Carry Bear Spray:

  • Always carry bear spray in an easily accessible holster on your belt or backpack. Ensure it is within reach in case of a sudden encounter.

Know Your Spray:

  • Familiarize yourself with the operation of your bear spray. Watch videos and run mock practices to ensure you can deploy it quickly and effectively

Understand the Range:

  • Bear spray typically has a range of 20 feet or more. Aim slightly downward to create a cloud that the bear must walk through.

Wind Consideration:

  • Be mindful of wind direction. If possible, position yourself so the wind is at your back, carrying the spray toward the bear. Avoid spraying into a strong headwind.
  • Consider bear spray to be like pepper spray. Avoid getting it in your own eyes, or you will also be blinded, causing retreat to be very difficult.

Effective Range:

  • Only use bear spray when the bear is within a close and charging distance. Using it too early may result in the spray dissipating before it reaches the bear.

Aim for the Face:

  • Aim for the face of the bear and spray in short bursts. The goal is to create a deterrent cloud, not to empty the entire canister at once.

Create a Barrier:

  • If the bear continues to approach, create a barrier of spray between you and the bear by spraying in a sweeping motion, doing your best to try not to get into the ‘cloud’ yourself.

Back Away:

  • Slowly back away from the area, keeping an eye on the bear. Do not turn your back on the bear until you are at a safe distance.

Here is a great video by Parks Canada on how to deploy bear spray:

When to Use Bear Spray:bears climbing on the rocks

During a Charge:

  • Use bear spray when a bear is charging or exhibiting aggressive behavior. The goal is to deter the bear and give it an opportunity to retreat.

Surprise Encounters:

  • If you unexpectedly encounter a bear at close range, especially in dense vegetation or around blind corners, be prepared to use bear spray.

Defensive Behavior:

  • If a bear shows signs of defensive behavior (standing on hind legs, huffing, jaw-popping), it may perceive you as a threat. Be ready to use bear spray.

Remember, the primary goal is to avoid encounters by making noise, traveling in groups, and being aware of your surroundings. Bear spray is a tool of last resort and should be used responsibly and in accordance with guidelines provided by wildlife management agencies.

Conclusion:

Bears are truly magnificent creatures, embodying strength, resilience, and a majestic presence that commands respect. As we venture into their natural habitats, it’s essential to remember that we are guests in their homes. Bears play a vital role in maintaining the ecological balance of their ecosystems, and their behaviors are often rooted in survival instincts. While their sheer size and power may evoke awe, it’s crucial to recognize that bears generally mean no harm. They are intelligent beings with complex social structures and familial bonds.

Respecting their space and understanding their behaviors fosters a harmonious coexistence, allowing us to appreciate the beauty of these remarkable animals while ensuring our safety and theirs. With responsible behavior, awareness, and adherence to bear etiquette, we can share the wilderness with these magnificent creatures, appreciating the privilege of witnessing them in their natural habitats.


flood where cows find higher ground

From the coastal regions of Atlantic Canada to the flat prairies and the rugged landscapes of the Northwest Territories, flooding is a shared concern. In this comprehensive guide, we delve into flood preparedness and how to protect our homes and our belongings.

Understanding Flood Risks:

Canada’s flood risks are multifaceted, influenced by factors such as heavy rainfall, flash floods, rapid snowmelt, storm surges, and coastal erosion. Here is a list of flood risks to consider for your area:

Natural Factors:
  • Heavy Rainfall: Intense and prolonged rainfall can lead to flash floods and river flooding.flooded river
  • Flash Flooding: A flash flood is a sudden and intense flood that occurs within a very short period, typically within six hours of heavy rainfall or other events that rapidly introduce large amounts of water to a specific area.
  • Snowmelt: Rapid melting of snow, especially in the spring, can contribute to river and urban flooding.
  • Ice Jams: Accumulation of ice in rivers during the winter that can obstruct the natural flow of water, leading to localized flooding.
  • Storm Surges: Coastal areas are susceptible to storm surges during hurricanes or intense storms, causing flooding along shorelines. It is a sudden and abnormal rise in sea level along a coastline. This phenomenon is primarily associated with tropical cyclones, hurricanes, or severe storms that make landfall near coastal areas.
Geographical Factors:
  • Low-Lying Areas: Regions with low elevation are at a higher risk of flooding, especially during heavy rainfall or storm events. Low-lying areas are susceptible to flooding for most specifically because they do not have adequate drainage, being at a lower elevation.
  • Proximity to Water Bodies: Areas near rivers, lakes, and coastal regions are more vulnerable to flooding.
Human-Induced Factors:
  • Land Use Changes: Deforestation and changes in land use can impact natural drainage patterns
  • Infrastructure Condition: Poorly maintained or inadequate infrastructure, such as levees and dams, can lead to flooding if they fail.
  • Inadequate drainage systems: can exacerbate flooding risks
  • Urbanization: Urban areas with increased impervious surfaces can experience rapid runoff
Climate Change:
  • Sea Level Rise: Rising sea levels due to climate change increase the risk of coastal flooding.
  • Extreme Weather Events: Changes in weather patterns may result in more frequent and intense storms, elevating flood risks.
  • Previous Flood Events: Understanding the history of flooding in an area provides insights into recurrent risks and potential vulnerabilities.
Specific Regional Risks:
  • Prairie Provinces: Flat terrain and rapid river flow contribute to the risk of river flooding.
  • Atlantic Canada: Coastal regions are susceptible to storm surges and heavy precipitation, increasing the risk of coastal and river flooding.
  • British Columbia: Combination of river and coastal flooding risks, particularly in regions with heavy rainfall and proximity to the ocean.
  • Quebec: River flooding due to snowmelt and heavy spring rains is a common risk.
  • Northern Regions: Ice jams in rivers during colder seasons can lead to sudden flooding.

Create a Comprehensive Emergency Plan:

In regions like the Prairies, where vast plains can experience rapid river flooding, having a well-thought-out familysign peaking out after a flood emergency plan is paramount. Practicing evacuation procedures ensures readiness in the event of a flood. Consider the following in your preparations:

  • Evacuation routes
  • Designated meeting points
  • Contact information
  • 72 Hour Kits (to grab and go) & Emergency kits (to hunker down at home)

Install Flood Barriers and Seals:

Coastal communities, particularly in Newfoundland and Labrador, where storm surges are prevalent, invest in robust flood barriers and seals. These structures act as a formidable defense against water infiltration, shielding homes from the impacts of severe weather events.

Stay Informed:

In northern regions like Yukon and Northwest Territories, where ice jams can lead to sudden flooding, staying informed is crucial. Real-time monitoring of river levels through advanced technologies helps residents anticipate potential flooding and take timely action.

global warming climate change police car in the flood of Calgary

In the Event of a Flood: Post Flood Response

Ensure Safety First:

  • Wait for Official Clearance: Do not return to your home or affected area until authorities declare it safe to do so. Floodwaters may have caused structural damage, and hidden hazards could pose risks.
  • Beware of Contaminated Water: Floodwaters can carry contaminants, including sewage and hazardous substances. Avoid contact with floodwater to prevent waterborne illnesses.

Document the Damage:

  • Take Photographs: Document the damage to your property by taking photographs. This will be crucial for insurance claims and disaster assistance applications.
  • Keep Records: Maintain a record of damaged items, including their approximate value and purchase date. This information will aid in the claims process.

Contact Your Insurance Provider:

  • Notify Your Insurance Company: Contact your insurance provider as soon as possible to report the damage. Provide them with the documentation and information collected.
  • Understand Coverage: Understand the extent of your insurance coverage, including coverage for structural damage, contents, and additional living expenses.

Coordinate with Emergency Services:

  • Stay Informed: Continue to stay informed about post-flood developments through official channels. Follow guidance from emergency services and local authorities.
  • Follow Evacuation Orders: If you were evacuated, follow instructions on when and how to return. Emergency services will provide guidance on re-entry procedures.

Assess and Repair Structural Damage:

  • Consult Professionals: Engage professionals to assess structural damage to your home. Address immediateflood safety concerns and prioritize repairs to prevent further damage. Coordinate with your insurance company before doing any repairs.
  • Secure Permits: Obtain necessary permits before beginning any repairs or reconstruction. Local building codes must be adhered to.

Dispose of Damaged Items:

  • Dispose Properly: Dispose of damaged items according to local regulations. Separate hazardous waste from regular debris.
  • Be Cautious of Mold: Be vigilant for mold growth in damp areas. Safely remove and dispose of contaminated materials to prevent health issues.

Conclusion:

In the face of the daunting challenges that floods bring, it is heartening to witness the resilience and compassion that communities display. As the waters recede, the true spirit of care and solidarity emerges. Remember, recovery is not a solitary journey but a collective effort. Reach out, support one another, and together, we can rebuild, heal, and create a future that stands resilient against the tides of adversity. In every act of kindness, in every helping hand extended, lies the promise of a brighter, more compassionate tomorrow.